Gathering a true understanding is extremely important and the Putting ideas listed below are ‘Detailed’, offering a ‘Deeper-Dive’ into the idiosyncrecies of Putting. By no means is this the end all to your putting adventure, instead these might offer a nice refresher course. Maybe it might even bring back some of those positive thoughts you had during your golfing / putting crusade. Remember, the only time you get better is when ‘No One’ is watching. Like any other sport or activity, you have to put the time in. And sometimes it takes ‘Longer’ than you think, but keep focused on ‘YOUR’ own journey. Change is hard, but once you find your ‘Groove’ and start seeing that ball get into the cup – you’ll realize all that practice is starting to pay off for you!
Let's Get going!
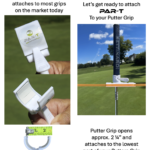
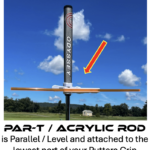
PAR-T / acrylic rod is positioned intentionally at the LOWEST portion of your Putter Grip. PAR-T / acrylic rod automatically and immediately interacts with your EYES and HANDS at ADDRESS, allowing you to SEE and FEEL ‘THE HOW’ par-t / acrylic rod as you move the putter head during your putting stroke.
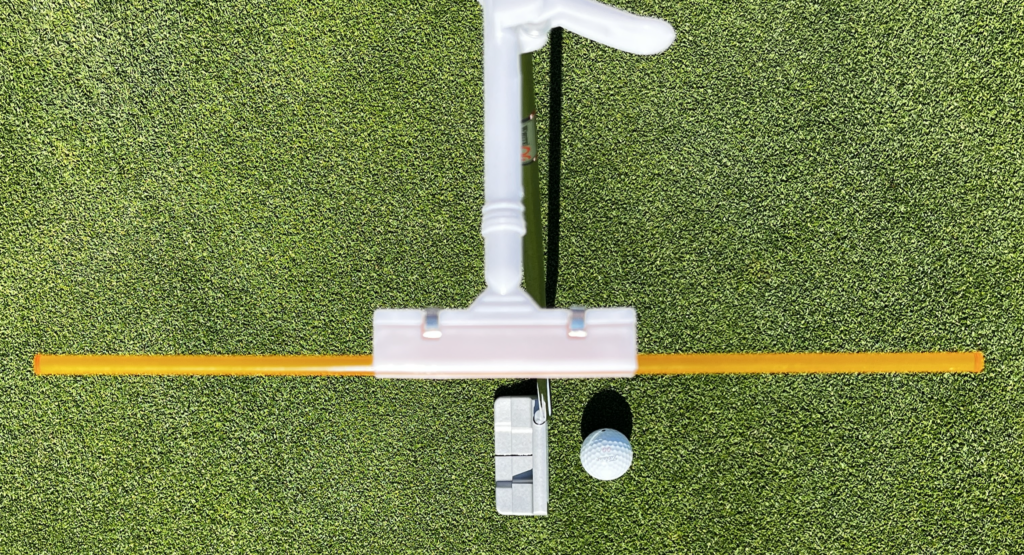
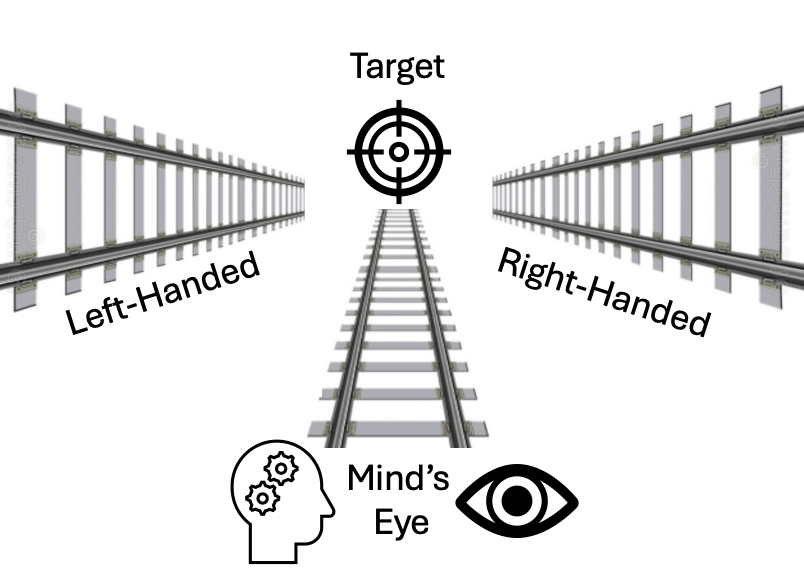
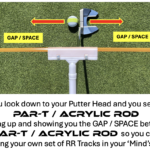
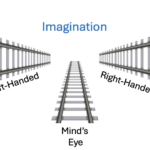
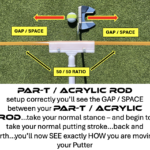
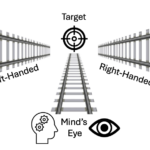
You’ll notice how the markings on your Putter Head (line/s or ball/s) interacts with the par-t / acrylic rod being used as a GUIDE to BUILD the 2″ – 3″ GAP / SPACE at ADDRESS. This GAP / SPACE allows you to start tapping into your IMAGINATION. Now you can start to build your own set of RAILROAD TRACKS (Tool) to form and begin to work within your ‘Mind’s Eye’.
The par-t / acrylic rod will show your EYES and HANDS – ‘THE HOW’ you are currently moving your putter. It is very important to IDENTIFY your putting stroke and SEEing your movement. Knowing ‘THE HOW’ is critical to make any adjustments, on your journey in becoming a better putter.
Your IMAGINATION is extremely important to use in the game of golf, as in many other sports. Many times you’ve heard someone say, “SEE the shot before you HIT the shot”. They are suggesting that you use your IMAGINATION and visually SEE the shot in your ‘Mind’s Eye’, before you execute the shot. Building your own set of Railroad Tracks (Tool) in your ‘Mind’s Eye’ and using your IMAGINATION to help you accomplish your goal – making more putts. This TOOL (Railroad Tracks) that you built in your ‘Mind’s Eye’, can be taken out on the golf course and providing you added confidence to start your putts on your intended Target Line, making them with confidence and consistency.
After using your PAR-T / acrylic rod, you’ll be able to SEE / FEEL ‘THE HOW’ you are currently stroking or moving your putter. Once you are able to IDENTIFY your current putting stroke, then you can make any slight adjustments necessary to improve your stroke. You can begin to GROOVE those minor adjustments while using PAR-T / acrylic rod as your GUIDE.
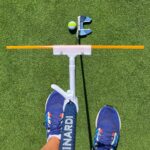
As your EYES look down at the Golf Ball & Putter Head, you’ll SEE the markings (line/s or ball/s) on your Putter Head and you’ll SEE ‘THE HOW’ they interact with the acrylic rod. This is a great starting point (please reference the picture named ‘RIGHT’ in the Gallery) that serves as a fantastic visual example to replicate as you use your PAR-T / acrylic rod and Putter at ADDRESS.
Once the par-t / acrylic rod is inserted in the Top Rod Channel and lines up with the markings on your Putter Head, you should SEE a 2″ – 3″ GAP / SPACE between those markings on your Putter Head (at ADDRESS) and SEE how par-t / acrylic rod interacts with your putter. This is where you build on your IMAGINATION and building your own set of Railroad Tracks in your ‘Mind’s Eye’. The picture in the Gallery (labelled RIGHT), you’ll see an example of what you need to actually SEE during your ADDRESS.
Once you get PAR-T / acrylic rod setup correctly on your Putter Grip and begin to SEE that 2″ – 3″ GAP / SPACE, use this visual as your ‘Point of Reference’. And the next time you use the PAR-T / acrylic rod, it will be easy to setup especially at ADDRESS. And as you us it more often, it will get easier to setup and everything will become second nature.
DON’T BLAME ME…if you become a better putter by using PAR-T / acrylic rod.
Are moving or flicking your wrists when you are Putting? If this describes your current putting stroke, then inconsistency is really your only benefit. Let’s try to get your wrists either much ‘Quieter’ of ‘Totally Out’ of your putting stroke – starting today!
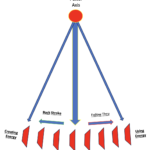
Replace those ‘whippy / springy’ wrists with your SHOULDERS. Think about the arm of a Grandfather Clock and incorporate that Pendulum arm swing image into your putting stroke. The Pendulum Arm inside the Grandfather Clock swings back and forth, always on the same path. The Arm is synchronized and moves without any ‘hitch or hiccup’. This can serve as a point of reference to incorporate into your own putting motion.
If you can translate or use this as an example to incorporate into your own putting stroke. You’ll soon SEE and FEEL a reliable motion that you can consistently count on. Once you attach your PAR-T / acrylic rod to your Putters Grip, is a great first step in finding ‘THE HOW’ your putting stroke is tracking. They say “SEEing is Believing” and now I’m adding in ‘FEELing is Believing’.
This is the main reason why I built PAR-T / acrylic rod. I wanted to have the ability to SEE and FEEL, at the same time and this putting aid was something that checked all the boxes – lightweight – easy to carry – and actually worked.
If you are attempting to build a NEW putting stroke, a new path or at least improve on your current putting stroke – then PAR-T / acrylic rod is exactly what the Doctor ordered. Removing your wrists out of your current putting stroke is very important in building a new foundation. Having PAR-T / acrylic rod attached to your putters grip is an important part of your transition.
Using a Right-Handed Putter as the example, these are some of the motions that your putter might move:
- Straight Back and Straight Through to Your Target on the Follow Through.
- Slight Inside Arch on your Back Stroke and then Straight Through Your Target on the Follow Through.
- Major Inside Arch on the Back Stroke and then Straight Through Your Target on the Follow Through.
After you finish with your Follow Through, most golfers will likely Finish with a SLIGHT or MAJOR ARCH to the INSIDE. This is the most Natural Motion when you finish your putting stroke.
Most golfers finish there Follow Through slightly INSIDE of the intended Target Line. You might get the feeling that you are PULLING the ball as you finish to the INSIDE, is a Natural Movement. Your ARMS naturally swing from one side to the other as you simply walk and each ARM swings freely and you’ll notice how your ARM / HAND finishes out in front of you. Even though your ARM / HAND started it’s motion at your side…try it and your both FEEL and SEE it for yourself.
Take a few practices putting strokes (without a ball) before you attach your PAR-T / acrylic rod to the LOWEST portion of your Putters Grip.
Your acrylic rod interacts with your putting stroke, SEE (Eyes) and FEEL (Hands) ‘THE HOW’ your stroke is ‘Tracking’. SEEING and FEELING is BELIEVING!
Concentrate on ‘THE HOW’ you are moving your Putter…that is why PAR-T / acrylic rod is positioned to the LOWEST portion of your putter grip, so it is close to both your EYES and HANDS – providing you IMMEDIATE feedback. Because of this position, you are able to SEE and FEEL ‘THE HOW’ your current putting path / stroke is moving.
Stay consistent in your ADDRESS, Takeaway Speed (Backswing), and then make sure you are Re-Squaring your Putter Face (at the IMPACT ZONE). Finally you’ll finish with the Extension / Follow Through towards your intended Target Line.
The key factor is going S-L-O-W and being deliberate (over exaggerating is key, just like you are doing an isometric). This will begin to re-train your muscles and create NEW Muscle Memory that you’ll need, as you begin to make your adjustments and becoming a better putter.
- Straight Back and Straight Through Your Target on the Follow Through.
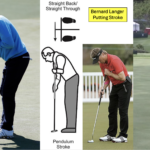
- This putting stroke is best served by the example of Bernard Langer / Adam Scott and their ‘Long Shafted Pendulum Style Putter”, producing a tremendously consistent putting stroke.
- The Grandfather Clock and the Pendulum Arm inside, moves in a regimented manner from Right to Left.
- Without this Long Pendulum Putter, this stroke is very difficult to ‘duplicate’ with more traditional putters.
- The Straight Back and Straight Through stoke can be achieved with Traditional Putters…BUT ONLY ON SHORTER PUTTS…like inside of 3′ or 8′ putts. At this distance you don’t have a lot of movement of the putter to get the golf ball to the hole.
- Inside of 3′ or maybe even 8′ putts, try the Pendulum Stroke to see how it works for you with your 34″ or 35″ Traditional Putter & Shaft. Within specific distances the Pendulum Stroke might be your ‘Go-To’ stroke, as is repeatable and provides you some reliable consistency.
- The Pendulum Putting Stroke is really NOT a NATURAL movement…what do I mean by this:
- First try this – as you walk, your arms and hands swing freely and you notice HOW they move in an Semi-circle motion, back and forth without any effort…and NOT like a Toy Soldier.
- That is WHY the Pendulum Stoke is difficult to mimic outside of 6′ to 8′ putt, or where you feel it isn’t possible to maintain this ‘Straight Back – Straight Through’ motion, without your putter moving INSIDE at any moment during the putting stroke. is difficult to sustain.
- Why does Bernard Langer and Adam Scott use the ‘Long Shafted Pendulum Putter’? I’m not sure but if I had to guess:
- It works for them becasue they are able to move the putter in a consistent and synchronized motion.
- They have become comfortable putting with this long shafted putter and using this unique repeatable stroke under tournament conditions.
- More imporatnly, they have confidence with this ‘system’ of putting and it works for them after many hours, days, weeks, months of practice.
Many golfers try to use the Pendulum Putting Stroke but this a very difficult stroke to duplicate with Traditional Length Putters (34″, 35″, etc.). However, it is very important to take your wrists out of your stroke and begin to use your shoulders, while having ‘Soft Hands’ during your putting stroke.
Try to use this Pendulum Stroke with your Traditional Putter within 8′ to 10′ putts. I think that you’ll find out very quickly that to duplicate this movement is hard to do at a certain range. It’s a great exercise and it will help you get the FEEL necessary, so you are comfortable potentially implementing this Pendulum Stroke. Then outside of that range,you’ll be using your own stroke.
1) START your putting stroke by SQUARING the Putters Club Face with the BALL at ADDRESS.
2) Begin your Backstroke…most golfers will take the Putter back ‘SLIGHTLY to the INSIDE’…as you move the putter back you are NOW beginning to Build Inertia / Force…at this time you’ll SEE ‘THE HOW’ your PAR-T / acrylic rod is moving, you’ll SEE ‘THE HOW’ your path is tracking. See the Pendulum illustration in the Gallery to the Right and it will show you HOW the Arm is moving.
3) As you take your backstroke, you’ll get to a point where you PAUSE / HESITATE, before you begin DOWNWARD, back towards the golf ball. As you begin this TRANSITION, you are now LOADED with Inertia / Force, in order to move the golf ball towards the intended Target Line. As you Move / Descend the Putter Head towards the golf ball, to make contact and make the golf ball roll at the intended Target Line.
4) Getting your Putter Head, back to SQUARE at the IMPACT ZONE, is one – if not the most important factors to get your golf ball rolling towards your intended Target Line.
6) The IMPACT ZONE, is where you are Transferring / Transitioning the FORCE / INERTIA that you built up during your Backswing. Having your Putter Head SQUARE at the IMPACT ZONE is the #1 reason why the golf ball travels in a specific direction – good or bad.
7) With PAR-T / acrylic rod on your putter grip, you’ll SEE ‘THE HOW’ your stroke is interacting and transitioning. Focusing on the movement of the PAR-T / acrylic rod shows you ‘THE HOW’ your Putting Path is traveling. With your PAR-T / acrylic rod pointing towards your intended Target Line, this provides you immediate feedback,and shows you if you are pointing at the intended Target Line or not.
8) At this point you will or should SEE two (2) things – First (1st) – Is my golf ball traveling towards your intended Target Line and Second (2nd) – where is my acrylic rod pointing and tracking? One thing will effect the other and visa versa, so make sure they are working as ONE unit.
Most golfers finish their Follow Through slightly INSIDE of the intended Target Line. You might get the feeling that you are PULLING the ball as you finish to the INSIDE, which is normal. So finishing with your Follow Through Slightly INSIDE is a Natural feeling, just like having your ARMS naturally swing from one side to the other as you simply walk.
This is a personal choice and varies from golfer to golfer. We all like a certain style of Putter Head (Blade, Half-Mallet or Mallet) or maybe how the ball FEELs coming off the Putter Face, or any variety of reasons.
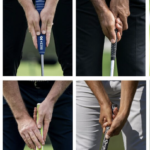
Pictured in the Gallery to the Right, you’ll see some of the Various Putting Grips that players are using today. The KEY is to find the Putter that you really like, and then a Grip that is comfortable in your hands. It doesn’t matter what your method looks like, the ONLY thing that matters is – CAN YOU GET THE BALL IN THE HOLE!
There are so many great putters both in the past (Chi Chi, Crenshaw, Trevino, Faldo, Casper, Nicholas, Watson, Palmer, Hogan, Snead, Couples, Moe Norman, etc.) along with so many playing on the Tour today (Max. Rory, Rickie, Jordan, Bryson, Tiger, Bubba, Rahm, Phil, Scottie, Dustin, Hideki, etc.).
Everyone has a favorite player that they like and try to emulate…so check out some of you favorite players and Google them. You can learn by viewing HOW they ADDRESS their own putting stance and routine, including their Grip, Style of Putter Head, Ball and Body Position. But remember that every golfer has their OWN preferred method, putter used,ball used and other personal and unique items. Again, once you FIND the method that works best for you, then now you’ll need to recreate that method…and soemtimes durnig the season, a FINE-Tuning is always a good thing to have and implement into your routine periodically. Some golfers putting are pictured in the Gallery.
There are many interesting and very good putting aids on the market today to choose from. Here are some examples: Putting Mirror, Laser Beam, Putting Arc, Putter Wheels, Putting Gates, Alignment Sticks, etc. All of these offer the necessary tools to become better putters and different methods to improve your putting. This is a very personal decision and not ALL aids will serve the same purpose to each individual, so make sure you are using the aid that works best for ‘YOUR’ eye and provides you the results you are looking for.
What is the biggest difference in what par-t / acrylic rod offers the everyday golfer? par-t / acrylic rod shows you ‘THE HOW’ your putting stroke is tracking, and it opens up the one thing that we all possess – our IMAGINATION within our ‘Mind’s Eye’.
Par-t / acrylic rod actually opens up your ‘Mind’s Eye’ ( IMAGINATION) to build your own set of RR Tracks. Having this TOOL in your Toolbox is the ONLY thing you can actually bring with you to the course. Once you ‘Train’ yourself and begin to actually SEE the RR Tracks forming in your ‘Mind’s Eye’. You are now building your own ‘Point of Reference’, improving your ALIGNMENT ability and assisting you with SEEING your Intended Target Line.
Try it – you’ll like it!
